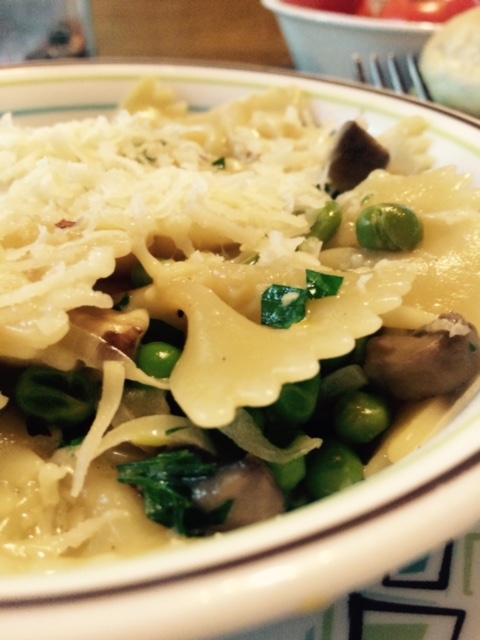
Feeds:
Posts
Comments

For Mother’s Day I wanted to make a new dessert.  I saw this recipe for a Strawberry and Prosecco Tiramisu which sounded great.  Only problem was that I ran out of time and ended up making a plain pound cake topped with a sweetened marscapone topping.  Also made a blackberry mascapone topping.  It went over so well that I had no time to take a picture of it!  Too bad because it looked so pretty with the golden yellow of the pound cake, the creamy marscapone and then the lavender of the blackberry topping.  I thought the cake was a bit dry but everyone else disagreed with me.

Pound Cake

  • 2 sticks butter, room temperature
  • 2 cups all purpose flour
  • 1 cup sugar
  • 4 eggs, room temperature
  • 2 tsp vanilla
  • 1/2 tsp salt

Directions:

  • Preheat oven to 350
  • Prepare a loaf pan by using your preferred method.  I spray it with Pam and then dust a bit of sugar instead of flour
  • Beat sugar and butter until it is light and fluffy
  • Add eggs one at a time, beating well after each addition
  • Add vanilla and salt
  • Gradually add flour and beat until just mixed
  • Bake for one hour at 350, tenting if the top is browning too quickly
  • Cool 15 minutes in the pan then finish cooling on a rack


Sweetened Marscapone Topping

  • 8 oz marscapone cheese
  • 1/4 cup sugar
  • 1 – 2 tsp vanilla

Directions

Beat all together.  I used my hand held electric mixer and it whipped it up so it was nice and creamy.


Blackberry Marscapone Topping

  • 8 oz marscapone cheese
  • 1/4 cup sugar
  • 1 cup blackberries, rinsed and patted dry

Directions

Beat all together using hand held electric mixer until smooth.  There will be some pieces of blackberry that don’t get pureed but that’s okay.


Roasted Red Cabbage

Oven roasting vegetables brings out the natural sweetness that lies within. For Passover we roasted fennel and caullflower both to be served at room temperature with a simple dressing. It went over quite well with our guests. Last night I roasted up a head of red cabbage. So good! The outermost leaves got a bit charred so we just tossed them but the inner leaves turned soft but not mushy and were just sweetened a bit from the roasting. The core softened to the point where my husband said it was like eating bone marrow…soft, tender and delicious. This will definitely be making a repeat visit to our dinner table!

Roasted Red Cabbge

P1000007

Ingredients

  • 1 head red cabbage, cut into wedges
  • olive oil
  • salt
  • pepper

Directions

  • Preheat oven to 450.
  • Place cabbage wedges on a baking sheet lined with parchment paper
  • Toss with oil to coat all sides of the cabbage wedges
  • Season with salt and pepper
  • Put in oven and cook for 20 – 30 minutes. Depending on the size of the wedges.

Feel free to add whatever spices or herbs you wish. I did sprinkle mine with some red pepper flakes. A splash of apple cider vinegar and a bit of brown sugar would be a nice idea too. Somewhat of an homage to German style Sweet and Sour Red Cabbage.

Several friends have been praising the benefits of Kale to me for a while now. We’ve had it a few times and it has been ok, nothing earth shattering until last night. Roasted kale chips. How could I have not tried these before? They were ridiculously simple to make and so well received by the family that we will be including them in our regular meal rotation for sure.

To make them -
Separate the leaves from a bundle of kale. Wash and pat dry. Remove the thick stem from the middle of the leaf and tear the leaf into small pieces. Place them on a baking tray lined with parchment paper. Add some olive oil to toss them with, making sure that all leaves get covered with the oil. Salt and pepper to taste. I used a generous pinch of kosher salt and a few twists of pepper from my grinder. Pop them into a 375 degree oven for 15 – 20 minutes. They will be crisp, airy and slightly browned.

The kale can be heaped onto the baking sheet, don’t worry about trying to make it a single layer. It will reduce down when it cooks.

Indian Home Cooking: A Fresh Introduction to Indian Food, with More Than 150 Recipes
Indian Home Cooking: A Fresh Introduction to Indian Food, with More Than 150 Recipes by Suvir Saran
My rating: 4 of 5 stars

Great introduction to Indian cooking. Easy to follow recipes with clear directions take the fear factor out of Indian cooking. Nice photographs but I would have preferred a photo of each recipe. With a cuisine that I am not entirely comfortable with yet it makes it easier for me if I have a reference photo to look at. The author gives easily accessible substitutions for hard(er) to find ingredients.

View all my reviews

Of course I couldn’t just bake the brownies the way he told me to.  I had to make one or two small changes.  I added 1 tsp espresso powder to deepen the flavor and when I sprayed the pan instead of flouring it, I dusted it with ground hazelnuts.  I also added a handful of chopped hazelnuts to the top for decoration and crunch.

Ingredients

  • 4 large eggs
  • 1 cup white sugar (he said to sift it, I didn’t)
  • 1 cup brown sugar (ditto)
  • 8 ounces melted butter
  • 1 1/4 cups cocoa (again he said to sift and I didn’t)
  • 2 tsp vanilla
  • 1 tsp espresso powder
  • 1/2 cup flour
  • 1/2 tsp kosher salt
  • Pam for pan
  • Ground hazelnuts for pan
  • Handful chopped hazelnuts for topping

Directions

  • Preheat oven to 300 degrees.  Spray or butter an 8 x 8 pan and dust with ground hazelnuts.
  • Beat eggs with mixer until light and fluffy.  Add white and brown sugars.  Mix well.
  • Add remaining ingredients except chopped hazelnuts.  Mix to combine
  • Pour batter into the pan.  Sprinkle with the chopped hazelnuts
  • Bake for 40 – 45 minutes.  They are done when a toothpick inserted comes out clean or the house smells so good you can’t stand to not have them be done soon enough!
  • Allow to cool on a rack before cutting or transferring to a platter.

** After cooling and tasting these I am not sure they are my favorite.  They are a bit cakey for me.  I prefer my brownies denser and fudgier BUT the idea of using the ground hazelnuts in place of flour or sugar for the pan is a brilliant one if I do say so myself.


adapted from Alton Brown’s recipe which can be found here.

Vanilla Chai Bundt Cake with chai spiced glaze

I had seen this recipe for chai spiced cupcakes and knew that I HAD to bake them. I love anything vanilla and am completely addicted to Chai as a drink.  I kept waiting for the right time and yesterday for break fast seemed to be the perfect time.  Cupcakes didn’t seem right so I swapped the cupcakes for a bundt pan.  It baked up nicely but on the smaller side.  Maybe make a double batch of batter next time?  Not sure but regardless it was delicious!  No pictures, sorry.  Will try to bake another one to photograph.  Oh, and the original recipe called for a vanilla chai buttercream which sounded great but I didn’t have any more butter.  Can’t believe that I ran out of butter but I guess it happens!

Cake ingredients:

  • 1 stick (1/2 cup) butter
  • 1 cup sugar
  • 2 tsp vanilla extract
  • 2 eggs
  • 1/2 quantity chai spice mix (recipe to follow)
  • 1 1/4 cups plain flour
  • 1/4 tsp salt
  • 1/2 cup buttermilk
  • 1/2 tsp baking soda
  • 1/2 tsp apple cider vinegar

Chai Spice Mix

  • 3/4  tsp ground cardamom
  • 3/4 tsp ground cinnamon
  • 1/4 tsp ground ginger
  •  1/8 tsp ground nutmeg

Glaze 

  • 1 1/4 cups confectioner’s sugar
  • 3 tbsp milk
  • 1 tsp vanilla
  • remaining spice mixture

Directions:

For the cake

  • Preheat oven to 325 degrees. Grease a bundt pan
  • Mix spices together in small bowl and set aside.
  • Cream together the butter and sugar.
  • Add the vanilla and beat in one egg at a time.
  • Stir in 3/4 of chai spice mix.
  • Sift together the flour and salt into a separate bowl.
  • Fold in the flour mixture and buttermilk alternately and stir until combined. Be careful not to over mix.
  • Mix together the baking soda and vinegar and stir into the batter.
  • Pour into the bundt pan and bake 15-20 minutes or until a toothpick inserted in a center comes out clean.

For the glaze

  • Mix together 1 1/4 cups confectioner’s sugar with 3tbsp milk (we used half and half because that’s what we had).
  • Add a tsp of vanilla and the remaining spice mixture.  Mix well.
  • Drizzle over the cake.

adapted from http://www.whatmegansmaking.com/

The mornings are getting cooler and the air is smelling crisp!  Definitely one of my favorite times of the year.  The days are still warm enough for short sleeves and you can sleep with the windows open to catch the cool breeze.  Perfect sleeping weather.  Also perfect apple picking weather.  That’s what we did today.  The family headed up to Maskar’s Orchard in Warwick, NY.  Jeff and I both went there as kids and as adults we try to go there every year.  They grow a mess of different apples. Today we got: Macintosh, Empire, Cortland and Granny Smith.  What does one do with 25 pounds of apples?  Bake of course!  Applesauce will be made later but tonight I baked Apple Cinnamon Cupcakes and an Apple Cake to take with us to my parents house tomorrow for our Rosh Hashanah celebration.

Apple Cinnamon Cupcakes (from Martha Stewart)

Hannah (11)  picked out the recipe and helped me bake them.  She did a great job!  Martha’s recipe calls for making marzipan apples and a cream cheese frosting.  I will probably make the cream cheese frosting tomorrow but not the marzipan apples.  Who has time for that?

  • Yield: Makes 2 dozen

Ingredients

  • 2 1/4 cups all-purpose flour
  • 2 teaspoons baking soda
  • 2 teaspoons ground cinnamon
  • 1/2 teaspoon ground nutmeg
  • 1 teaspoon salt
  • 8 tablespoons (1 stick) unsalted butter, softened
  • 2 cups sugar
  • 2 large eggs
  • 1 teaspoon vanilla extract
  • 4 cups coarsely shredded apples, such as Macintosh (about 1 3/4 pounds)

Directions

  1. Preheat oven to 350 degrees. Line two standard muffin tins with paper liners; set aside.
  2. Whisk together flour, baking soda, cinnamon, nutmeg, and salt in a medium bowl; set aside.
  3. Cream butter and sugar on medium-high speed in the bowl of a mixer fitted with the paddle until pale and fluffy, about 5 minutes.
  4. Mix in eggs and vanilla.
  5. Reduce speed to low; mix in apples.
  6. Add flour mixture; mix, scraping down sides of bowl as needed, until just combined.
  7. Fill lined cups halfway with batter; bake until tops are springy to the touch, 18 to 20 minutes. Remove from tins; let cool on a wire rack.

——————————————————————————————————————————————————————————-

Apple Cake

My Dad asked for something gooey along with the cupcakes.  I thought about an apple cake and figured that I could make my standard caramel sauce to go with it.  I searched Pinterest (love that site!) and came up with this.  The only thing I changed from the original here was that we didn’t have any dark rum so instead I used 2 tsp of almond extract.  Haven’t sliced into it yet so I can’t report on how it is, but it looks fabulous!


Ingredients
  • ¾ cup all purpose flour
  • ¾ tsp baking powder
  • pinch of salt
  • 4 large apples
  • 2 large eggs
  • ¾ cup sugar
  • 2 tsp almond extract
  • 1 tsp pure vanilla extract
  • 8 Tb (1 stick) unsalted butter, melted and slightly cooled
 Instructions
  1. Center a rack in the oven and preheat the oven to 350 degrees F. Generously butter an 8″ springform pan and put it on a baking sheet lined with a silicone baking mat or parchment paper.
  2. Whisk the flour, baking powder, and salt together in small bowl.
  3. Peel the apples, cut them in half and remove cores. Cut the apples into chunks or slices, as preferred.
  4. In a medium bowl, beat the eggs with a whisk until they’re foamy.
  5. Pour in the sugar and whisk for a minute or so to blend. Whisk in the rum and vanilla.
  6. Whisk in half the flour and when it is incorporated, add half of the melted butter, followed by the rest of the flour and the remaining butter, mixing gently after each addition so that you have a smooth, rather thick batter.
  7. Switch to a rubber spatula and fold in the apples, turning the fruit so that it’s coated with batter. Scrape the mix into the pan and poke it around a little with the spatula so that it’s evenish.
  8. Slide the pan into the oven and bake for 50 to 60 minutes, or until the top of the cake is golden brown and a knife inserted deep into the center comes out clean; the cake may pull away from the sides of the pan. Transfer to a cooling rack and let rest for 5 minutes.
  9. Carefully run a blunt knife around the edges of the cake and remove the sides of the springform pan. (Open the springform slowly, and before it’s fully opened, make sure there aren’t any apples stuck to it.) Allow the cake to cool until it is just slightly warm or at room temperature. If you want to remove the cake from the bottom of the springform pan, wait until the cake is almost cooled, then run a long spatula between the cake and the pan, cover the top of the cake with a piece of parchment or wax paper, and invert it onto a rack. Carefully remove the bottom of the pan and turn the cake over onto a serving dish.
 Notes
The cake will keep for about 2 days at room temperature. However long you keep the cake, it’s best not to cover it — it’s too moist. Leave the cake on its plate and just press a piece of plastic wrap or wax paper against the cut surfaces.


Follow

Get every new post delivered to your Inbox.

Join 317 other followers